
Showing posts with label Jack N. Show all posts
Showing posts with label Jack N. Show all posts

Monday, 23 November 2009
Images of other soft rock album covers


As you can see from these album covers all of them are similar to each other as they are all sitting down and the main focus of the overall picture.
Monday 23th November - Digi Pack
Today we are gathering ideas for our digi pack we found that CD covers or posters for our slow rock genre generally shows the artist sitting down. We saw this with the Elton John CD which Jon brought in and for the album cover for our artist five for fighting Two Lights. Therefore we all decided for our album cover is to have Dan the main character sitting down next to a mirror and in the reflection you will see Dan and Jess but they will be animated. Therefore the mirror is the pathway between real life and animation. We are planning to use the Dance studio in college to take images for our Album cover.
Thursday, 19 November 2009
Pictures of an example album cover


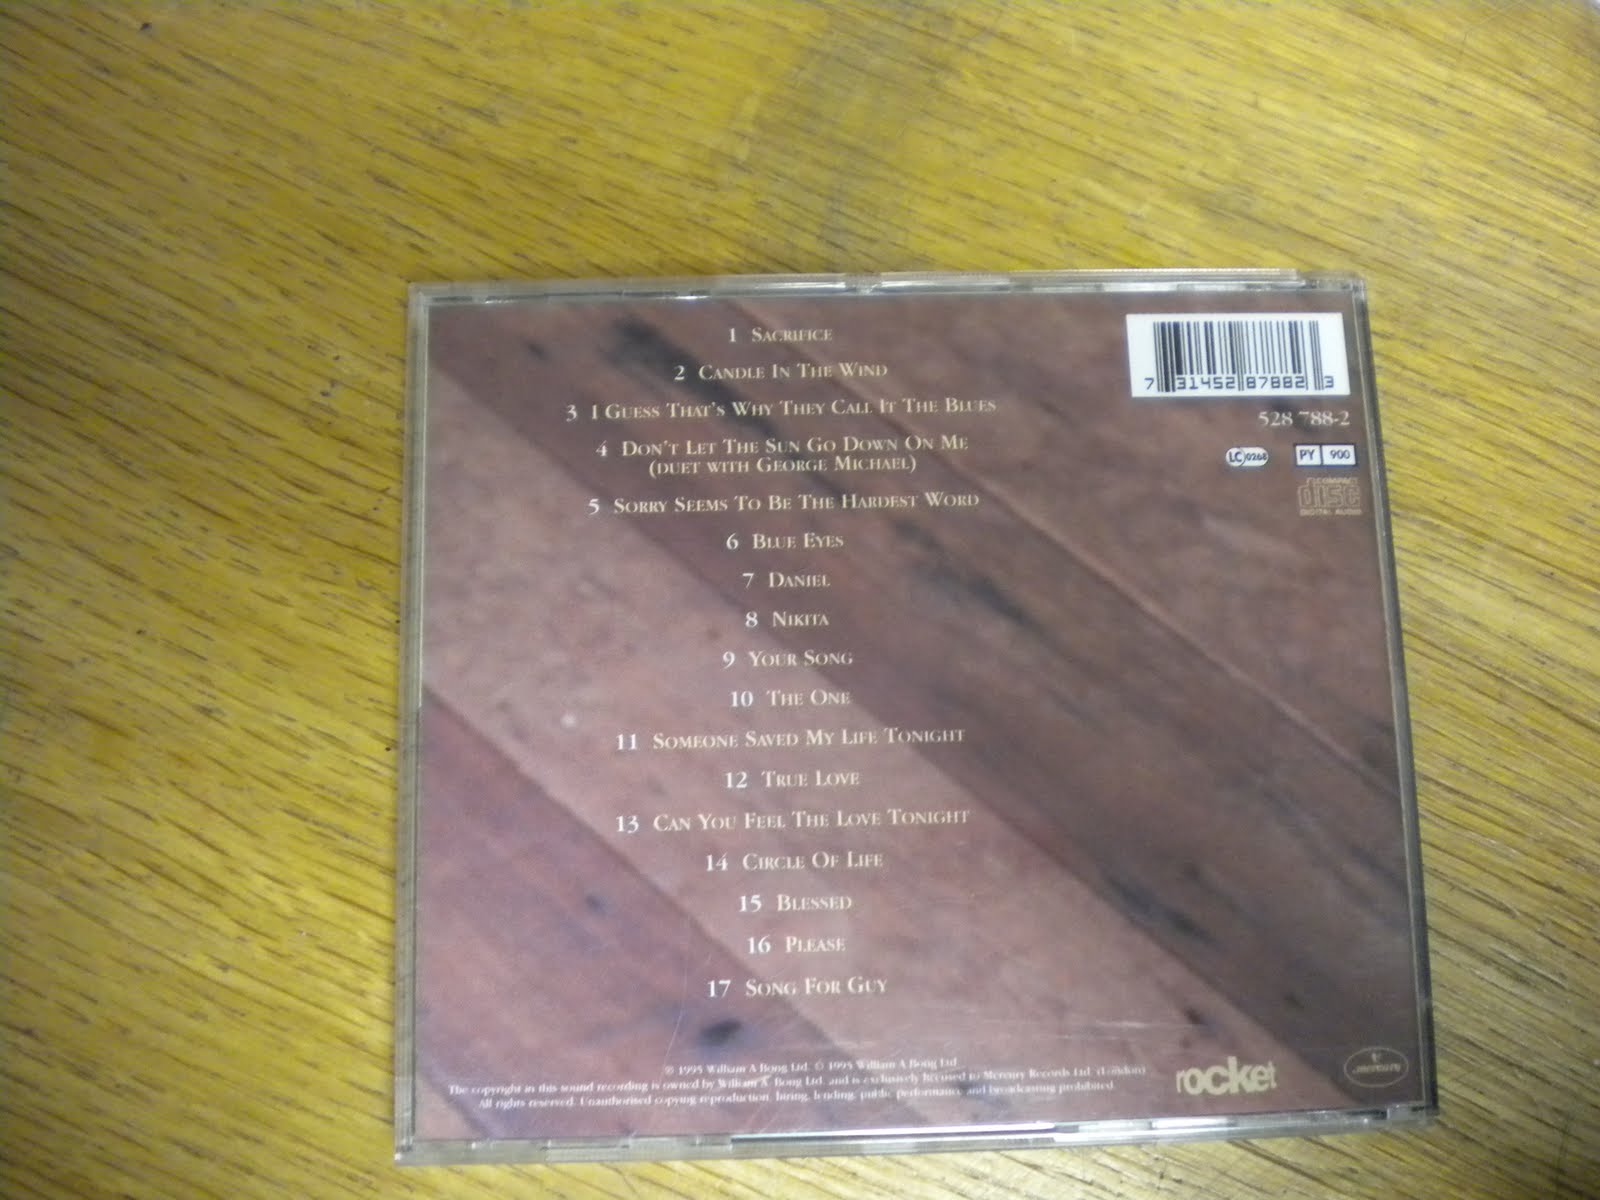

From this album cover we can see the variety of things we need to include in our digi pack. For instance, you can see a picture of the artist which is selling him well, inside cover shows lyrics so you can sing along and learn the words. There are also other albums inside to sell others. Finally, there is a list of what songs are on the track listed on the back cover.
Wednesday, 11 November 2009
Another Animation Effect
Today alongside preparing the stars for one of our animation narratives we have also created another short animation with a slightly different effect. During our feedback of our rough cut we were picked up upon the faded amount of the animation making them hard to see. We experimented by overlaying a parchment effect on the images.
Here is the pencil effect animation
Here is the pencil effect animation
Here is the pencil effect with a parchment overlay animation
wednesday 11th October
Today we are continuing with finishing editing our photos for our animation by adding stars to the photos so it shows relationship between lyrics and visuals. Also we are also finishing our digipack.
Monday, 9 November 2009
Filming improvments
When we film again we need to re-film the animation of of the performance with better lighting so that the animations work better, we will also shoot more performance shots to make the film more interesting as it will not always be the same shot and we will do more close up shots of the piano being played,and we will change the lighting of the over all performance will be more clear.
Week Schedule
Today : We are going to finish our digi-pack and add stars to our animation.
Wednesday : We are filming any extra footage that we need at 1.05 - 4.10pm
Thursday : On thursday our group is coming in to edit our music video 5pm - 9pm
Wednesday : We are filming any extra footage that we need at 1.05 - 4.10pm
Thursday : On thursday our group is coming in to edit our music video 5pm - 9pm
Wednesday, 4 November 2009
Feed Back Response
We will do some more film so that we can get some more varied shots for the performance part of our video and make the video more interesting as well as this we will also film the in side animations again with more light show they are not as light and so more visible, the way we will make the characters in the video mare defined we will export the video at a higher quality.
Thursday, 22 October 2009
thursday 22th october
today we are continuing editing our video in finalcut express putting all the animation in the right place and making sure the video is sync with track.
Monday, 19 October 2009
Two Animation Styles
When creating our animation we tried several different styles. Our final two styles were a charcoal effect and a pencil effect. We decided that the pencil effect was the effect that we were looking for but we decided to create the shortest animation in both styles.
Here is the Charcoal effect:
Here is the pencil effect:
As you can see the pencil effect is the most like a sketchbook
Monday 19th october
Since we have completed animation in photoshop, today we are putting our footage and animation into finalcut.
We needed to research how to make stars into our animation therefore Jack N researched it into the internet how to make stars in photoshop he found this website http://www.photoshopessentials.com/photo-effects/starry-sky/ . He followed the steps and this is his final picture.

We needed to research how to make stars into our animation therefore Jack N researched it into the internet how to make stars in photoshop he found this website http://www.photoshopessentials.com/photo-effects/starry-sky/ . He followed the steps and this is his final picture.

Thursday, 15 October 2009
Thursday 15th October
Since yesterday we have converted all of our animation images into the pencil style drawing by using the technique we mentioned previously. From our original idea of projecting the shots and then making them animated by drawing round them, we are glad that we were able to find this alternative technique as to draw best part of 800 frames would have taken a long time.


One thing that we did find with the images was that it required around 8GB of storage space.
Here you can see the two folders that we store the images in and there sizes
This is the folder containing all 800 frames once they had been flattened. As you can see the size is much less.
We then imported the images into final cut and found that final cut struggled to cope with the image adjustments and multiple layers that we had created in photoshop. So because of this, we had a look into the problem and found that by amending the action that we had recorded to convert the image into a flattened image this preserved the effects so that we could add this into the animation. Unfortunately we didn't get enough images converted so we will aim to get it finished and edited on Monday.
Wednesday, 14 October 2009
Inspiration to Application
Our ideas from various places have all been inspired by something.
Originally we thought that doing an animation was a good idea. This idea changed as we realized our track had a bit of a storyline, so we added performance and a storyboard to the animation idea suggested by Jack N. Jack then suggested we should do pencil drawings for the animation, this idea was skeptical because we had to think about how long it would take, but Jack said he had many friends in the art department who could give a hand, so this made it more appealing.
In one of the next lessons Rob looked on youtube for more inspiration as he came across an old classic, take on me by A-ha. Rob then looked into how it was done in which we found out that they did the shots and then traced them. Jon took a light to this and decided on the night at home, to use his projector and trace himself in pencil.
We realised that this could take a very long time, after doing our filming, Rob looked into a pencil effect for final cut, no such luck, but came across a pencil effect for photoshop, with both Rob and Jon tried on different versions of photoshop. We found that the newer version initially was completely different due to a different technique to design the colour dodge, so this made the older version which Rob was using look better for the style we wanted. Jon then played with the image adjustments on the newer version and found that this new technique combined with the image colour adjustments seemed to make it look slightly better than the older version.
Our final problem to overcome was the amount of photos that we had to convert, which wouldn't be possible for us to recreate the same effect over an 800 image spread. So we took the idea of Macro's on Microsoft office and created a similar recreation in photoshop called actions. Jon had to adjust these settings many times to recreate the style correctly. Jon then played with the Batch Automation settings on photoshop while Rob, Jack and Jack N were splitting up the animation sections from Final Cut. The Batch Automation allowed us to allow Photoshop to executed an action on a batch of photos, so in our case our batch of 800 photos were able to be converted.
Originally we thought that doing an animation was a good idea. This idea changed as we realized our track had a bit of a storyline, so we added performance and a storyboard to the animation idea suggested by Jack N. Jack then suggested we should do pencil drawings for the animation, this idea was skeptical because we had to think about how long it would take, but Jack said he had many friends in the art department who could give a hand, so this made it more appealing.
In one of the next lessons Rob looked on youtube for more inspiration as he came across an old classic, take on me by A-ha. Rob then looked into how it was done in which we found out that they did the shots and then traced them. Jon took a light to this and decided on the night at home, to use his projector and trace himself in pencil.
We realised that this could take a very long time, after doing our filming, Rob looked into a pencil effect for final cut, no such luck, but came across a pencil effect for photoshop, with both Rob and Jon tried on different versions of photoshop. We found that the newer version initially was completely different due to a different technique to design the colour dodge, so this made the older version which Rob was using look better for the style we wanted. Jon then played with the image adjustments on the newer version and found that this new technique combined with the image colour adjustments seemed to make it look slightly better than the older version.
Our final problem to overcome was the amount of photos that we had to convert, which wouldn't be possible for us to recreate the same effect over an 800 image spread. So we took the idea of Macro's on Microsoft office and created a similar recreation in photoshop called actions. Jon had to adjust these settings many times to recreate the style correctly. Jon then played with the Batch Automation settings on photoshop while Rob, Jack and Jack N were splitting up the animation sections from Final Cut. The Batch Automation allowed us to allow Photoshop to executed an action on a batch of photos, so in our case our batch of 800 photos were able to be converted.
Our Animation Technique
Our initial idea of the animation was to draw individual frames of the animation and then use istopmotion to piece together the animation. Our biggest enemy for this style was time, as it would have taken around 30 mins for each photo to be sketched and with probably 12 frames a second for best part of a minute to sketch this would have taken a long time. The next idea was to use Photoshop to allow us to create the style of the sketchbook, as described below.

We began to test the idea by using some random images and seeing if we could import them into istopmotion for our animation. One problem that we found was that our images were 1920x1080 pixels and istopmotion could only handle 720x576 pixels, so this would make the animation a lower quality. We then decided to just import the images straight into photoshop.
Steps to editing our photo into animation in photoshop
1.Duplicate background layer
2.Then you invert mode grey scale
3.Filters - Blur - Gaussian Blur numbers 1-5
4.For tweaks you can use curves to change the particular areas' of intensity
We then used photoshop's inbuilt ability to record actions similar to macro's in office programmes. This automated the procedure above.


To apply this to multiple photos' we used the batch automation.

Monday, 12 October 2009
monday 12th oct
Today we are importing our video and preparing to do our animation using the istopmotion programme. We are comparing two techniques for our animation using photoshop the first one uses the charcoal filter using colour dodge as well and the second technique is a pencil sketch using blurs and colour adjustments.
Thursday, 8 October 2009
Test Footage
Here is some test footage that we used to check that the camera would work with final cut and to give use an idea of the locations for us to use.
Replies to the feeback made
We feel that we are pleased that our blog has received lots of good feedback however we feel that the improvements suggested are not all correct for example the feedback from t2-47 saying that we haven't included who the actors are but in fact we have and we do have the auteur research but we didn't post it in time.


